Subtle Blended Stencil Card Background - The Crafter's Workshop 2018

Friday, June 29, 2018

I wanted to share a couple cards that I created for The Crafter's Workshop and in my annual production to mail to my children during summer camp!


I chose a couple 6x6 stencils that had a fairly small, compact design that would transfer well to a small space.  I used some 3 dimensional adhesive on the small images I inked and then colored with Copic markers.


Below are the two stencils I used in my project.

The Crafter’s Workshop provided me with some product to create this project.  The opinions I share are solely my own.

I was very inspired by a recent post from Kristina Werner.  She used a couple stencils to create a blended background for some colored die cuts as the focus of the card.  She also added some of the blended stencil on the edge of the envelope to match the card.


I wanted to create a small circular area for a die cut image I colored to be adhered to the card, adding a sentiment underneath he image.


Using this repeating concentric circle stencil, I added Distress Oxide Inks with my stencil brushes, adding a light layer of pink and purple, overlapping the colors a bit.


After finishing the card, I used the same stencil and Distress Inks to brush a small area on the left side of the envelope, coordinating to the card but leaving space for the recipients address.


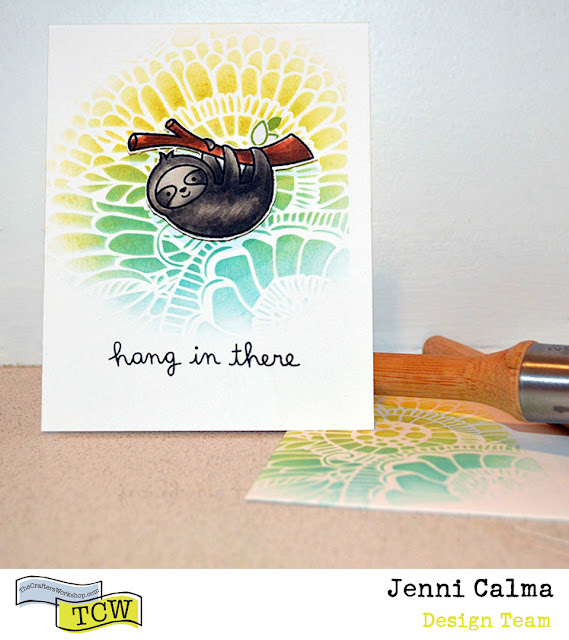
Next, I created utilized the same technique to create a card that is a little more masculine, for my son.


I started this card by using a 'mask' I made with a piece of cardstock and a large circle punch.  I really had intended to compose a loose circular shape, so the mask wasn't as useful as I had planned.  In this card, I used two different colors of Distress Oxide Ink, in a yellow and blue shade.


As in the previous card, I added an image that I colored with Copic markers, fussy cut and added dimensional adhesive to the stenciled area.  I also added a sentiment underneath the image.


I also stenciled a portion of the same 6x6 stencil to the mailing envelope to match the card as well.


Supplies Used:

Thanks for stopping by the Blog today!  With the vast inspiration of Pinterest, Instagram and all social media, there is an endless collection of ideas to apply the use of stencils to!  I hope this post challenges you to see inspiration everywhere.

FRESH EGGS - The Crafter's Workshop June 2018

Monday, June 18, 2018

Today I'm going to share a fun scrapbook layout I created inspired by the Rustic Signs stencil from The Crafter's Workshop, and the perfect timing of some awesome friends!

Below are the two stencils and the Clear Modeling Paste I used in my project.


The Crafter’s Workshop provided me with some product to create this project.  The opinions I share are solely my own.


I pulled lots of natural elements to use; kraft cardstock, cork, canvas ribbon letters and cream colored cardstocks.


Utilizing the large 'FARMHOUSE' text in the stencil, I brushed light layers of Distress Ink over the cream cardstock background, offsetting the text on every line.


I wanted to try to match the color of the ceramic egg crate to the color I used with the main title.  I mixed a couple of shades of blue acrylic with the Clear Modeling Paste. 


It was a difficult color blue to match and once I archived it, the Clear Modeling Paste was perfect to get the height and texture without diluting the color.


While the modeling paste dried, I used the 'Antique Linen' Distress Ink and a stencil brush to add some light color to the wood grain part of the 'Hard Textures' stencil.


After layering the two stenciled pieces of cardstock, I added the kraft cardstock for my title as the photo mat.  Below is the finished page and some details shots.


I added a subtitle with these canvas printed letters on ribbon and stitched them to the page.


Finishing off the page with some other embellishments, I mounted the entire background to another piece of patterned paper.


Supplies Used:

Thanks for stopping by the Blog today!  This layout was so much fun because I had a stencil that perfectly matched parts of our life.

ALWAYS BE YOURSELF - A Scrapbook Layout

Thursday, June 7, 2018


Today I am sharing a scrapbook layout I created for The Crafter’s Workshop using one stencil and 3 of the new pastes.  Although it looks simple, I actually created it twice, but it was a welcome accident since I think this layout turned out much better.

It wasn't what I had planned at all, but sometimes you have to embrace the mistakes and move on!  An ironically important lesson in my life right now! ;)


Below is the stencil and mediums I used in my project!


The Crafter’s Workshop provided me with some product to create this project.  The opinions I share are solely my own.


I had originally planned to use the phrase in the stencil to outline some hand stitching.  Unfortunately, I pierced the letters too close together and it didn't turn out like I'd hoped.


So, I started over...with the metallic pastes instead.


I masked the large 'unicorn' word so that I could use the Platinum Modeling Paste to accent it.


I added the Platinum paste partially over the Champagne Gold in the other 'unicorn' word as well.  I love the way it turned out with the combination of both pastes!


I decided to use some Distress Ink and some plastic wrap to add a light background for the photo.


I wanted to add some of the star shapes but wanted to keep it subtle, so I used the White Pearl modeling paste to add some shimmer and texture without overpowering the layout.


Below is the finished page and some detail shots.  I added a border of patterned paper to the sides and some gold & silver thread under the photo.  I also added some machine stitching between the patterned paper and the layout.


Supplies Used:


Thanks for stopping by the Blog today!  Sometimes, things don't turn out like we plan, lots of times, but I think art is the best place for that kind of happy accident to occur!  Embrace your happy accidents!!

Proudly designed by Mlekoshi playground