Framing & Outlining - A Scrapbook Layout

Thursday, April 19, 2018

Hello friends!  Today, I wanted to share a scrapbook layout I created using several of the newest stencils and metallic pastes from The Crafter's Workshop.


Below are the stencils and pastes I used in my project!


The Crafter’s Workshop provided me with some product to create this project.  The opinions I share are solely my own.


I used both sizes of two of the stencils to add dimension and a variation of scale.  Below are the products I used!


I started by using a stencil brush and Distress Oxide Ink to add a pattern to my background cardstock.


This Wilted Violet Distress Ink is a vibrant color, but when using these stencil brushes becomes much more subtle.


Using the Wild Roses template in both sizes, I outlined the petals using a waterproof Copic liner onto watercolor paper.


I painted violets, pinks and corals onto the rose outlines as well as some leaves.


While the watercolors dried, I used this beautiful White Pearl Modeling Paste to create an inverted frame within my previously stenciled area.  Instead of a white frame and pattern inside the center, I used the pattern as the frame, using the Modeling Paste to create a 'white' space in the center.


It has such a lovely iridescent finish while being very subtle.


While the paste dried, I went back to my watercolor flowers and fussy cut around them, making my own die cut flowers.


Laying out my photo and the flowers, I planned out the placement of the title.


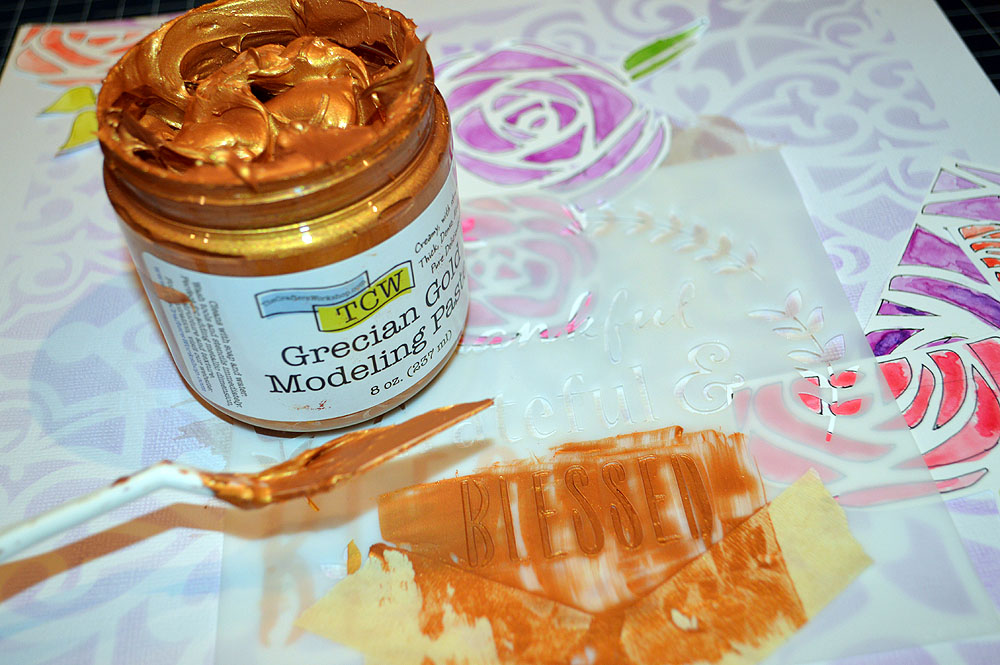
I decided to layer the two different sized stencils and different gold pastes adding some dimension to my title.


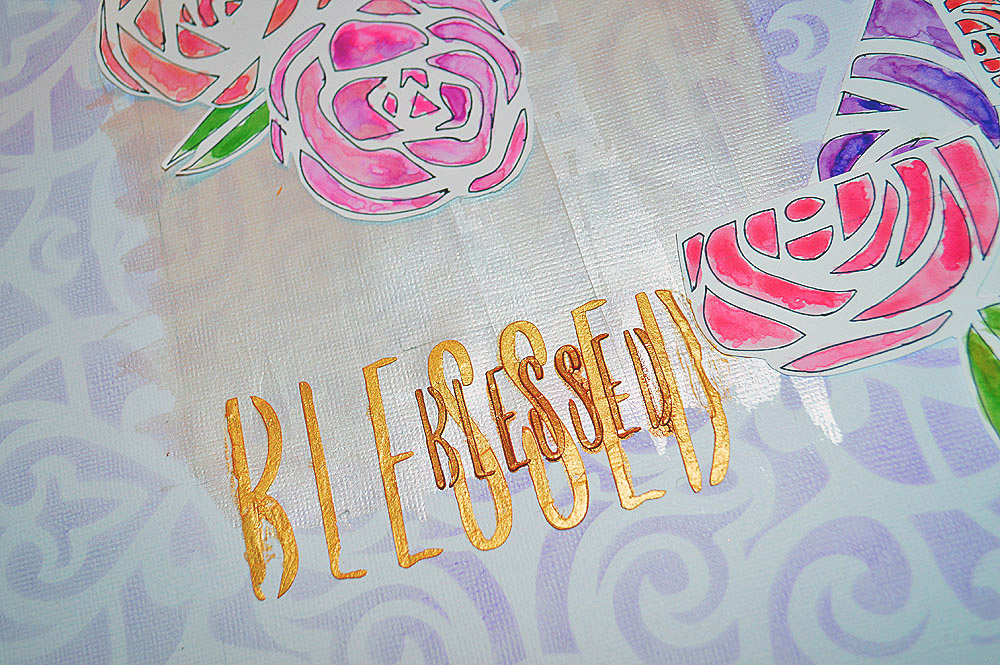
 Below are the close up pics!


Thanks so much for stopping by the Blog today!  I hope this inspires you to use a stencil to outline your own pieces to color, or create a reverse frame for your background!
TCW9036 – Champagne Gold Modeling Paste

The Crafter’s Workshop Design Team Member

Finding Inspiration for Cardmaking - The Crafter's Workshop April 2018

Wednesday, April 4, 2018

I am so lucky to always have a post at the beginning of each month with The Crafter's Workshop, and it is such a privilege to share some inspiration for a new month!

My husband and I just took our children to Chicago for Spring Break and one highlight of our trip was to see the Broadway production of Hamilton!  It was an amazing evening and so inspirational!  As an architect, one thing that inspired me was the theater itself, especially the ceiling in one part of the theater.  This is a detail of the ceiling and I immediately thought of a potential stencil project!


I used this photo of the ceiling detail as inspiration for several cards, using three different stencils and two different gold pastes on a vanilla cardstock background.


Below are the stencils I used as well as the Modeling Pastes.

The Crafter’s Workshop provided me with some product to create this project.  The opinions I share are solely my own.


I used masking tape to provide a border around each piece of cardstock.  Most of the pieces were trimmed down, so it didn't make much of a difference, but masking it off kept things neat.


I placed a piece of cardstock trimmed to a nit larger than a card size to my mat and then used a small palette knife to spread the Gold modeling paste over it.


I used the Grecian Gold and Champagne Gold pastes...my two favorite golds.


The stencils I used were both 12x12 and the smaller 6x6 size.


I used both pastes and varied the stencils to get several different card patterns.


After the backgrounds dried, I trimmed them down and attached them to a black card base using dimensional adhesive.


I chose several sentiments from a 'thank you' series of Hero Arts stamps and heat embossed them using gold embossing powder onto black cardstock.


I tried to use a simpler sentiment with the more complex stencil pattern & vice versa.


Thanks for stopping by today!  I hope this inspires you to look for crafty and creative ideas everywhere!  Have an amazing week!

Be sure to share your stencil creations on our Facebook page or by tagging The Crafter’s Workshop on Instagram, Twitter or Pinterest!
The Crafter’s Workshop Design Team Member
Supplies Used:

Seasons...Art Journal - The Crafter's Workshop

Monday, April 2, 2018

Today, I am sharing an Art Journal spread for The Crafter's Workshop that I created with Spring and the changing of Seasons in mind!  I had a quote that inspired me, but was mostly inspired by the changes in my own backyard.

 I used a variety of stencils and metallic pastes from the newest release, as well as some of the Heavy Body Acrylic paints to create this double page spread.  Below, are the stencils and mediums I utilized.


The Crafter’s Workshop provided me with some product to create this project.  The opinions I share are solely my own.


I knew I wanted to use this quote in my page and so after sifting through the stencils I decided to divide my spread into 3 sections.  One predominately yellow, one green and the final one more orange.


  Using Distress Ink, I stenciled those colors & a couple botanical patterns onto some Mixed Media Adhesive Sheets from ThermOWeb & Rebekah Meier.


I also inked these 'sun' designs, creating darker colors towards the center with these stencil brushes.


I added some of of this rich Grecian Gold Modeling Paste onto one of the stencil...it is a lovely deep, warm gold that blends perfectly with the oranges and pale reds I chose. 


While the ink and modelling paste dried, I used some gelatos and Neocolor crayons to create a contrasting base color to the Mixed Media papers I stenciled.  Before starting the project, I used the White Gesso on my pages as well as taping the binding to prevent leaking.

P
I used plenty of water to make it fairly muted.  I wanted main colors to be the yellow, green and orange to correspond with my quote.


I mixed similar shades of the Heavy Body Acrylic paints and spread them across this 12x12 lined, graphic floral, directly centered about the journal binding.


 My plan was to layer the previously stenciled Mixed Media paper on top of the large floral.  The mixed media sheets are somewhat transparent and I hope to create linear column of colors.


I adhered the sunshine stenciled pieces to opposite sides of the page, symbolizing the beginning of the day, with the sun high in the sky and the end of the day with the sun low in the horizon.


I wanted to add some of the metallic pastes, but didn't want to overpower the color theme with the golds.  Using the new Platinum Modeling Paste was perfect.  It is neutral enough in color, but still has a lovely shimmer.


In an attempt to make the color theme more prominent by providing more contrasting colors, I added some of the Neocolor crayons and watercolors to the background and stenciled patterns.


Next, I used various black pens and markers to outline the stencils.


 Feeling the need to provide more contrast, especially at the edges, I added some of black ink using two different dot stencils.


Finally, not wanting to distract from the spread itself, I added my quote to the very bottom of the page...
"Some friends come into your life for a reason, others come only for a season."


 Thanks for stopping by the Blog today!  I hope this has been a bit of inspiration to kick off your New Year.  Be sure to share your stencil creations on our Facebook page or by tagging The Crafter’s Workshop on Instagram, Twitter or Pinterest!

The Crafter’s Workshop Design Team Member

Supplies Used:


Proudly designed by Mlekoshi playground